5 Smart Repairs for Veneering Mistakes
How to make invisible fixes for common problems
Synopsis: To be good at veneering, you must be good at veneer repair. Let’s face it: In the process of working with veneer, it can get chipped, scratched, dented, or blistered. The key is to have an arsenal of remedies, like these supplied by Stuart Lipp, that will get you through the toughest situations. Here, he offers advice on repairs from filling in dents to slicing and repairing blisters, to patching edge- or end-grain damage, to fixing large areas of damage.
No matter how careful you are when working with veneer, you’ll need to make the occasional repair. Veneers get chipped, scratched, dented, or blistered, and to be good at veneering, you also must be good at veneer repair. Not to worry. Just ask yourself the philosophical question: If you execute an invisible repair, did the damage ever really occur?
While my focus is on the construction process, the methods described here also can be applied to restoration, and some even work on solid wood. Keep in mind that existing glue and finish (topics I won’t address here) are big factors in restoration work. Also, when building a piece, it’s important to catch repairs early in the process; otherwise, construction could get in the way, such as with solid-wood edging or a frame around a panel.
Having an arsenal of remedies will get you through even the toughest of repairs, and experience will help you match the appropriate repair to the damage. I work with thin commercial veneers, but the same techniques apply to thicker, shopmade veneer.
Small repairs require a judgment call
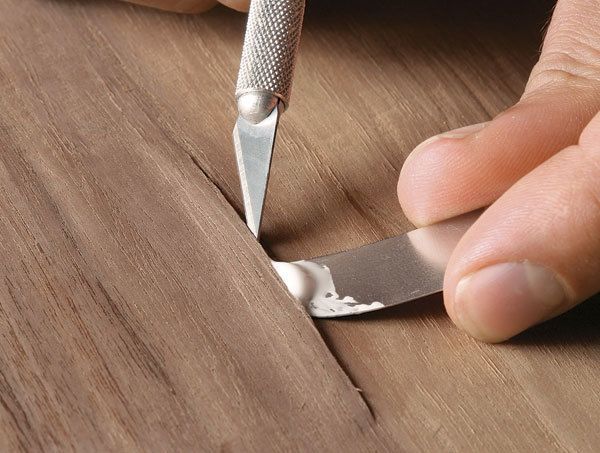
The first thing to do with damaged veneer is judge whether a repair is necessary. Don’t jump into a full-blown repair if you don’t have to. A small chip or dent on the edge of a piece often disappears when you break the edges, or you can be a little heavyhanded on that spot to ensure that it does. And there is nothing wrong with using putty once in a while to fill a tiny chip, crack, or split. It requires skill to color the putty with water-soluble aniline dye powders to match the wood perfectly. This fix should be used rarely and when the damage is very small, but it can save you from cutting into the veneer when it isn’t necessary.
Sometimes, to make a good repair you must first make the damage worse. A chip, loose edge, or split can be too small to repair successfully. If you try, you’ll most likely fail, causing a bigger mess. The only option is to “cut back,” or extend the damage into the surrounding veneer. This creates the ideal situation for a successful repair because it provides enough space on the substrate to get good adhesion and allows you to control the shape of the patch.
Choose the right glue
When choosing glue for a repair, try to match the veneer color as closely as you can. This way, if glue bleeds through the pores it will be less visible. For example, use white glue on maple, a tight-grained wood that is not usually stained. However, rosewood is a dark wood with open pores; white glue would bleed through and ruin it during finishing. Choose something dark instead, like urea formaldehyde glue. Also, any water-based glue can be colored with water-soluble aniline dye powders to match the wood.
From Fine Woodworking #196
For the full article, download the PDF below:


Log in or create an account to post a comment.
Sign up Log in