A Firm Foundation for a Backyard Shed
Here are four ways of building a basic, on-grade foundation for backyard buildings.
The longevity of any outbuilding depends heavily on its foundation. No structure—regardless of how well it’s designed or built—will survive for very long on a poorly made base. Constructing a proper foundation is the single most important step in the entire project.
On-grade vs. frost-proof foundations
Shed foundations fall into two basic categories: on-grade and frost-proof. On-grade foundations (sometimes called “floating foundations”—that’s this kind, not this kind) sit right on the ground and are sufficient for all but the very largest outbuildings. They’re also the quickest and simplest to build because they don’t require you to dig deep holes or pour concrete footings or piers. On-grade foundations are usually made of pressure-treated lumber or solid-concrete blocks.
Permanent, frost-proof foundations are more difficult to build, but they’re by far the strongest and longest lasting. This type of foundation is designed for cold-weather regions where ground movement caused by freeze/thaw cycles can affect a building.
The best foundation for your shed will depend largely on what the building inspector recommends, but keep in mind that it’s often based on three key factors: the size of the shed, the region of the country in which it’s being built, and the type of shed floor you plan to include.
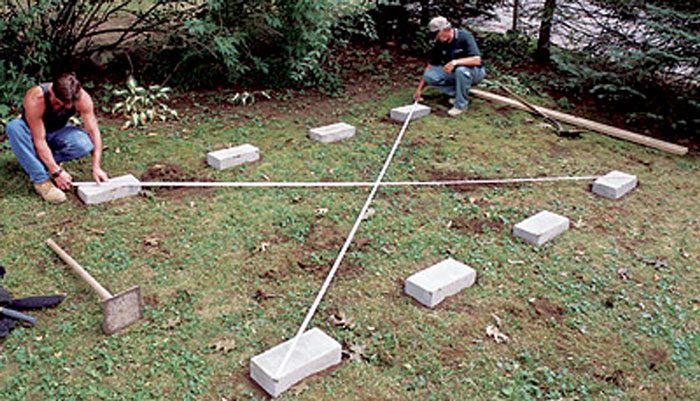
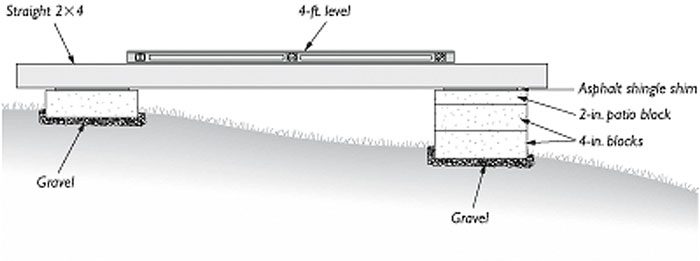
Trade secret – When building a solid-concrete block foundation, it’s important that all the blocks be level. However, it’s equally important that the blocks in each row be perfectly aligned. The best—and fastest—way to line up the blocks is with a taut string. Install the first and last block in each row. Then stretch a length of mason’s line along the edge of the two end blocks and use it as a guide to set the intermediate blocks.
Always start an on-grade foundation at the highest spot and work toward the lowest. If the property slopes more than 2 ft. or so over the length or width of the building, you’ll have to bring in some heavy equipment to level the property or choose another building site.
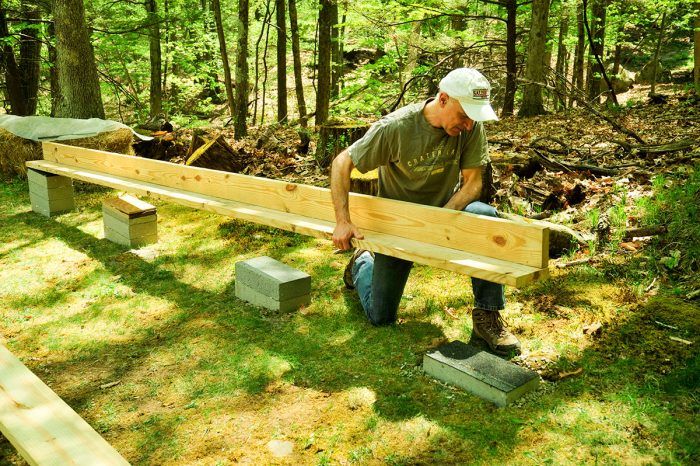
On-grade foundations
It’s no surprise that most sheds are designed to be built with an on-grade foundation. This base is quick and easy to build, relatively inexpensive, and adaptable enough to accommodate all but the most severely sloping sites. In addition, the components are small and light, making it easy to set them into place and adjust them. Although it’s not technically a permanent foundation, an on-grade foundation, when properly built, will probably outlast the shed it supports.
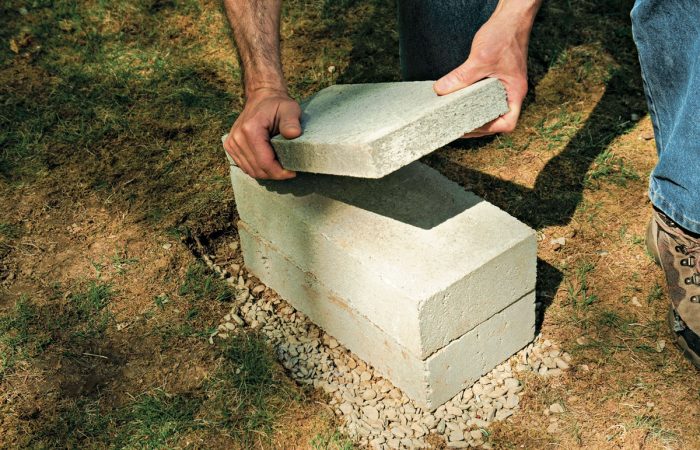
Trade secret – It’s often necessary to stack two or more solid-concrete blocks on top of one another to create a level foundation. To keep the blocks from sliding out of position as you set the floor frame in place, use a caulking gun to apply a generous bead of construction adhesive between the blocks. You can also use the adhesive to glue shims to the tops of the blocks.
Gravel and crushed stone are available in 50-lb. bags, but it’s cheaper if you buy it by the truckload from a garden shop, nursery, or masonry supplier.
An on-grade foundation will last a lifetime if the ground below remains dry and undisturbed. Never build on a site that collects standing water. Soggy soil will eventually swallow up the foundation. And don’t set the foundation too close to any trees. The roots can grow underneath the shed and lift the foundation right off the ground.
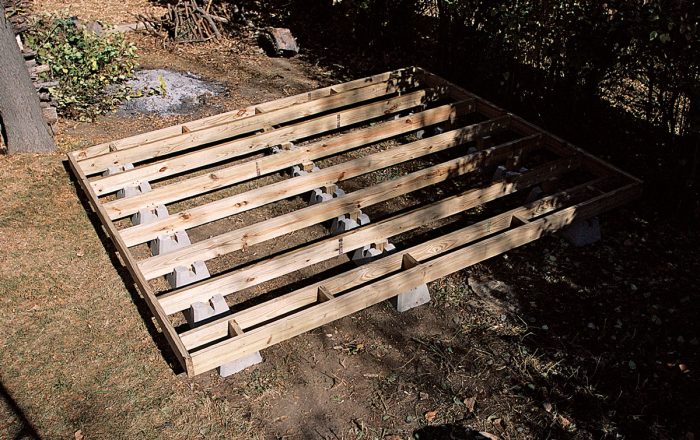
Solid-concrete blocks
In this type of foundation, the shed is supported by a series of solid-concrete blocks, which are laid out in straight, evenly spaced rows. The number of blocks needed and the spacing between them is determined by the size of the shed and the lumber used for the floor joists.
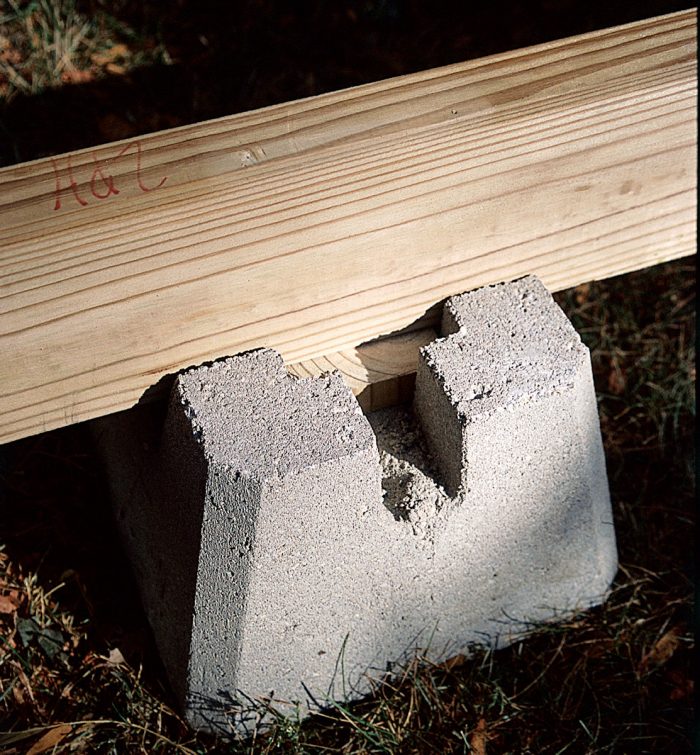
It’s important to note that you must use only solid-concrete blocks for this type of foundation. Standard wall block or any other hollow block will eventually crack and crumble under the weight of the shed. If you have trouble finding solid blocks at a home center or lumberyard, try a masonry supplier.
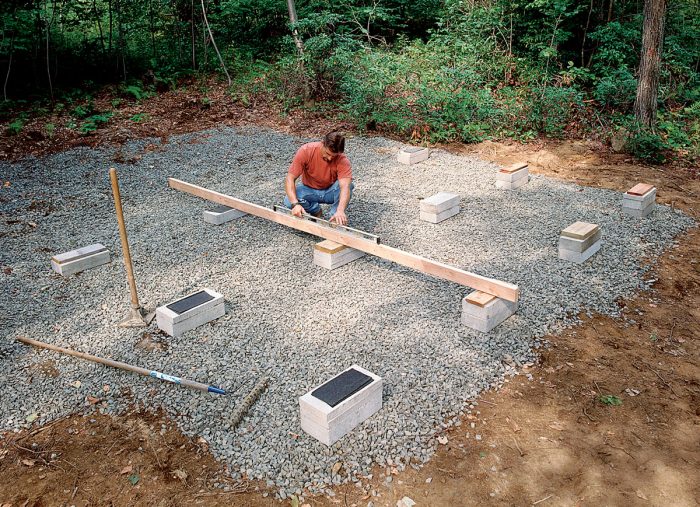
The blocks measure 8 in. wide by 16 in. long and come in 4-in.- and 2-in.-thick units. The thicker blocks are placed first, with the thinner patio blocks laid on top when you need to adjust the height at that spot. In some cases, you may need to stack two or three 4-in. blocks on top of each other to raise the lowest corner of the foundation so it is even with the highest corner.
If the building site is high and dry, you can set the blocks directly on the ground. However, if there’s any chance that rain runoff will occasionally drain under the shed, you’ll need to use a shovel to remove a patch of grass under each block, compact the soil with a hand tamper, then cover the exposed dirt with 2 in. or 3 in. of gravel before setting the blocks. The gravel bed will ensure that the soil beneath the blocks won’t wash away or become soggy.
In most cases, you’ll need both 2-in.-thick patio blocks and 4-in-thick solid-concrete blocks to build an on-grade foundation. A shallow bed of gravel under concrete foundation blocks aids drainage and helps prevent them from sinking into the soil. (Photos: Joesph Truini)
Precast pier blocks
This building method is similar to the solid-concrete block foundation. But instead of using flat blocks, a series of precast concrete pier blocks are used to support the shed’s floor frame. The pyramid-shaped blocks are designed for building decks, but they work great for sheds, too — provided you choose the right type.
There are a few styles of pier blocks available, including one that has a square hole molded into the top through which a vertical 4×4 post can be inserted. Another type has a flat wood block set into the top so you can toenail a joist in place. For building shed foundations, I use blocks measuring 8 in. high by 11 in. sq. and weighing about 45 lb. each. Molded into the top surface is a 3 1/2-in.-square recess and a pair of 1 1/2-in.-wide slots. The socket accepts a 4×4 post; the slots are used to support a 2x floor joist. Because they can accept either a joist or a post, they can be used on very uneven sites and badly sloping terrain.
A series of precast pier blocks, arranged in three straight rows, provides a simple, secure way to support a floor frame. (Photo: DekBrands)
A 2x joist fits into a slot molded in the top of this Dek-Block pier; the concrete pier will also accept a vertical 4×4 post. (Photo: DekBrands)

Wood foundation options

If there’s even the slightest chance that you may someday want to move your shed to another location, make the job easier by modifying the skids before you set them in place. Start by trimming off the bottom corners of the skids at a 45-degree angle so they’ll slide more easily over the ground. Also, bore a 1 1/2-in.-dia. hole about 4 in. from each end. That way, you’ll have a convenient place to hook up a tow chain or steel cable.
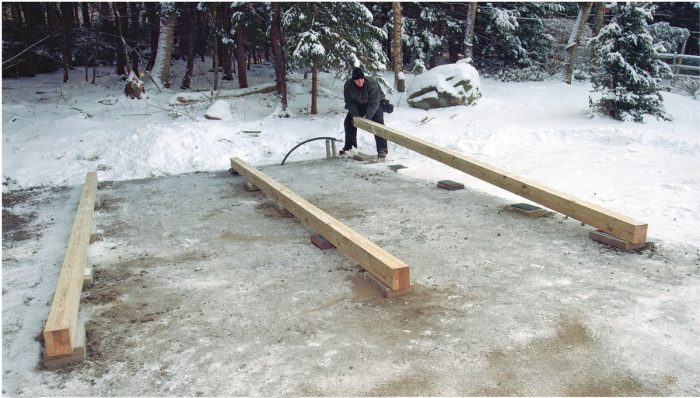
Skid foundations
 Skid Foundation: A skid foundation is a simple and effective way to support the floor frame of a small shed.
When it comes to time-tested building methods, it’s hard to beat a skid foundation. Builders have been using this type of on-grade foundation to support outbuildings for more than three centuries. The technique is surprisingly simple in both concept and application: Two or more long, straight timbers (skids) are laid on the ground in parallel, evenly spaced positions. The building’s floor frame is then built on the skids, which are sometimes called runners or deadmen.
Skid foundations are still popular today, and it’s easy to see why: They’re very fast and easy to build; and they distribute the building’s weight evenly over a broad surface. Unfortunately, because the timbers are long and straight, this type of foundation is suitable only for sites that are relatively flat.
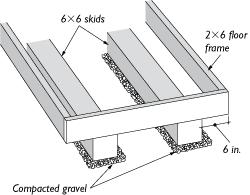
Originally, skids were nothing more than logs placed on the ground. Today, they’re usually made of pressure-treated 4x6s, 6x6s, or 8x8s. You can also make skids by gang-nailing together three or four 2x6s or 2x8s and setting them on edge.
Make sure that any pressure-treated material that comes into direct contact with soil is rated for ground contact. Wood that is rated only for above-ground use has lower levels of preservatives and won’t last as long. Labels attached to the lumber or the stamp should have this information.
Although skids are often set directly on the ground, I prefer to lay them on a bed of gravel. The stone creates a very stable base that’s not likely to settle or wash away. Begin by laying the skids in position on the ground, then mark around each one using spray paint or flour sprinkled from a can. Move the skids out of the way, then use a flat shovel to remove the sod and about 2 in. of soil from the marked areas. Check the excavated areas to make sure they’re close to being level. If they’re not, remove a little more soil from the high spots. Next, add 3 in. to 4 in. of gravel. Compact the gravel with a hand tamper or gas-powered plate compactor, then move the skids back into position.
Timber-frame foundations
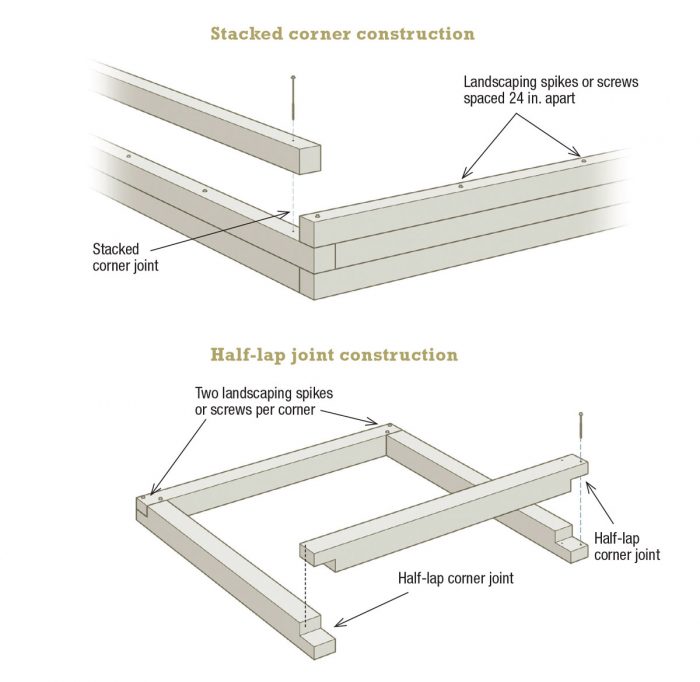
This foundation consists of little more than a rectangular wooden frame sitting on a gravel bed. The shed walls are built on the frame, and the entire weight of the building is transferred directly to the ground. The real advantage of this type of foundation is that you get to choose from a variety of flooring options. The floor area within the timber frame could be filled with gravel, concrete, crushed granite, marble chips, or slabs of bluestone or slate. Another flooring option is to nail pressure-treated 2x6s over the frame in a manner similar to that of a deck. Just keep in mind that the 2x6s must be installed before you erect the shed walls.
A foundation frame is typically made from pressure-treated 4x4s, 4x6s, or 6x6s. The timbers are joined with half-lap corner joints or stacked two or three high and fastened together with long landscaping spikes or screws.
Online members can watch entire how-to video series on building sheds, decks, and more:
Video Series: How to Build a Tool Shed – This Fine Homebuilding video series follows Rick Arnold as he constructs a charming and sturdy backyard tool shed.
Shop Class: Critical Deck-Framing Connections – In this 10-part series, home-building pro Mike Guertin outlines the details you need to make a deck safe, solid, and code-compliant.
Fast and Accurate Wall Framing – Builder Mike Norton shares tips for laying out, assembling, and raising walls to make the job easier and the results more professional.
Not an online member? Sign up for a FREE 14-day trial to access all of our how-to video series plus over 1,400 articles from Fine Homebuilding magazine.
This article is an excerpt from Building Sheds by Joe Truini. Before writing about carpentry, Joe Truini worked as a remodeling contractor, cabinetmaker, and carpenter. He lives in Litchfield County, Connecticut. Photos by Geoffrey Gross except where noted. Drawings by Mario Ferro.
More on sheds:
Build a Budget-Friendly Shed — Get ample storage and traditional styling on a budget of just $2000.
A Small Stylish Shed — Durable materials make this toolshed as long-lasting as it is attractive.
Shortcuts to a Shed — Time-saving tips about planning, materials, and construction that will get any outbuilding up in a hurry.
Begin With the End in Mind: Shed Layout and Floor Framing — Layout considerations begin before the first board is cut or fastener is driven. Beginning with the end in mind will assure optimal results for your shed project.


View Comments
I use instruction from woodprix website to build my own DIY projects – I highly recommend you visit that website and check their out too. They are detailed and super easy to read and understand unlike several others I found online. The amount of there is mind-boggling… There are tons of different projects. Definitely enough to keep me busy with projects for many more years to come haha. Get woodprix instructions if you want some additional.
My town requires an engineer to sign off on shed plans. The engineer I'm working with wants me to sink concrete sonotubes every six feet to secure the shed's skid-beams to the ground against wind-shear, either that, or a solid concrete slab with bolts through the sill-plate. Fine Homebuilding sheds simply perch on their foundations. It would be helpful to have a video on the various ways to secure the shed to the ground.