
I have propagated thousands of new shrubs from softwood cuttings. That may sound like a lot, but since I’m a propagator at a nursery, it’s all in a day’s work. To successfully propagate such a large number of shrubs requires specially designed hoop houses and state-of-the-art misting and heating systems. It’s also handy to have helpers to carefully monitor the health and well-being of each cutting.
On a smaller scale, though, it is possible to propagate deciduous shrubs from cuttings taken during the summer without the all the high-tech machinery and costly gadgets I have at the nursery. By creating favorable conditions, using the right tools, which are actually quite simple, and being patient, you can achieve success with softwood cuttings at home, too.
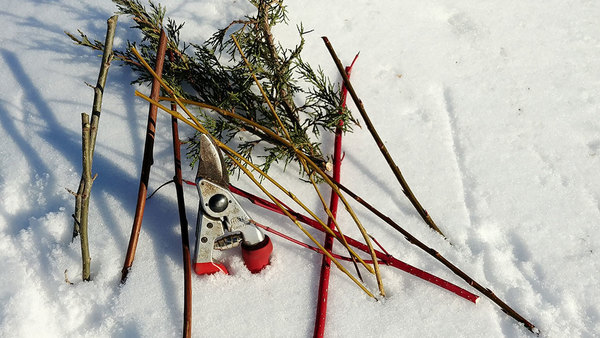
Harvest cuttings from semi-ripe growth
The trickiest part of propagating shrubs from softwood cuttings is knowing when a shrub’s stems are ready to be cut. Softwood, the section of a shrub’s stem that’s neither brand new nor fully mature, is the stage of growth on a deciduous woody plant that is best suited for rooting (for details, see “Softwood is neither green nor woody,” below). The newer, green growth that lies at the end of the stem will rot before roots are produced, and the older, more woody growth at the base of the stem has a harder time putting out roots.
Softwood cuttings can be taken from most deciduous shrubs in June and July and sometimes into early August. I determine a stem’s maturity by taking it in my hand and bending it. If the stem breaks with a characteristic snapping sound, it is in the softwood stage and ready to be harvested as a cutting. If the stem is still too green, it will bend but not break. If the stem is entering the woody stage, it won’t bend at all.
Softwood is neither green nor woody

Softwood is the term used to describe the stage of growth on a deciduous woody plant that’s neither the new, green growth at the end of a shoot nor the stiff, woody growth near the base of the stem. The softwood lies between the two. The best way to know if a shoot has reached the softwood stage is to bend it. If the softwood snaps, the shoot is ready to be taken as a cutting. If the shoot is very flexible and doesn’t snap, it’s too green. If the shoot is not flexible at all, it is too far gone.

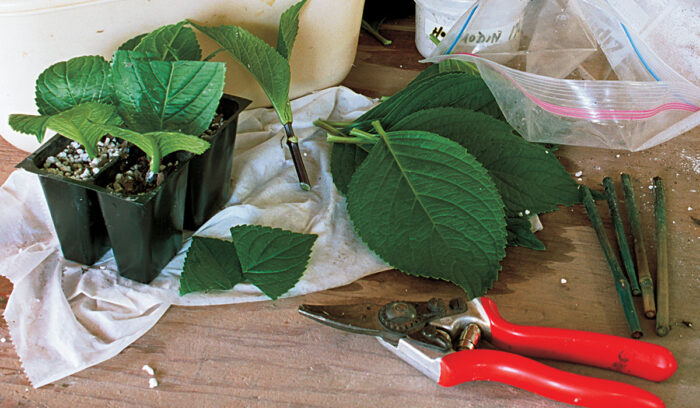
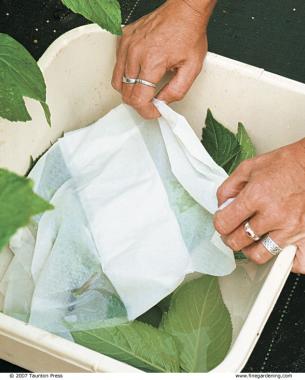
The best time to take cuttings is early in the day, when shoots are fully hydrated. Lateral shoots, or those that grow from a leader, make the best cuttings. I avoid weak, thin shoots, as well as overly thick, heavy ones. As soon as I take a cutting, I nestle it into a plastic basin that I’ve filled with damp paper towels. The towels will keep my cuttings moist and cool until I’m ready to head back inside and pot them up. They also shade my cuttings from the sun. Exposure to direct sunlight, even for only a few minutes, can cause irreparable damage. I also avoid taking cuttings on hot days, when plants may be wilting.
Keep cutting short to conserve energy
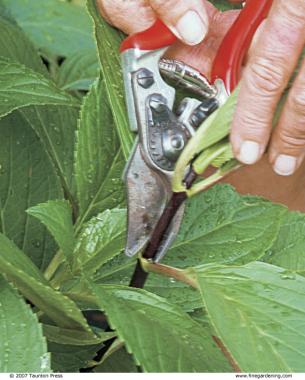
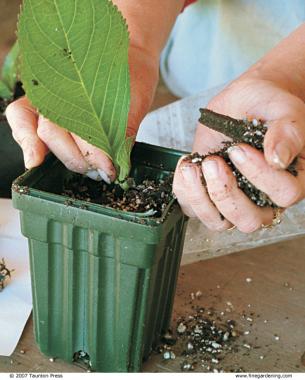
A cutting’s size is also something to consider. I like my cuttings to contain at least two sets of leaves. I use pruning shears to cut the stem from the shrub at about one inch below the second leaf node. Since the length between leaf nodes differs from plant to plant, the size of a cutting, using this rule of measurement, will vary. The average cutting should measure between 3 and 5 inches.
To prepare my cuttings for rooting, I remove the lower set of leaves to open up wounds on the shoot. It is at these wounded sites that rooting will occur. I also wound the end of the shoot’s tip by laying the cutting on its side and shaving away a strip or two of bark.
Use rooting hormone and provide good drainage
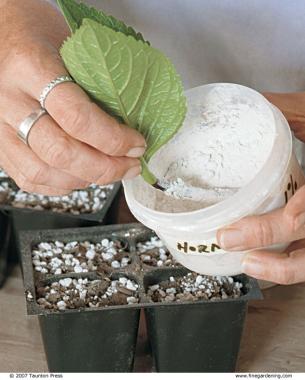
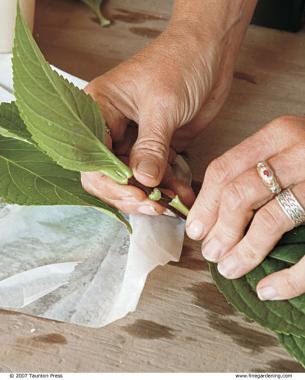
After I’ve wounded the cutting, I dip the end of the stem into water and then into rooting hormone powder. Softwood cuttings root more successfully when a rooting hormone is used. The object when dipping cuttings in rooting hormone is to cover the wounds completely. Rooting hormone contains the same auxins already in the stem that initiate root production. Coating the stem with hormone boosts the plants’ natural mechanisms to produce roots.
I’m careful never to dip cuttings directly into a jar of rooting hormone powder for fear that the cutting may contain a contaminant. To be on the safe side, I empty a small amount of the hormone into another container and dip my cuttings into that.
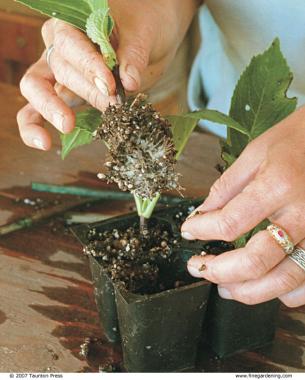
Once a cutting’s wounds are coated with rooting hormone, I gently tap off any excess and insert the stem into a six-pack or seedling tray filled with a moistened mixture of perlite and soilless mix. The potting mixture we use at the nursery is 60 percent perlite and 40 percent soilless mix. This mix provides the good drainage and maximum aeration that new roots need. Cuttings placed into a mix that holds moisture is apt to rot before rooting occurs.
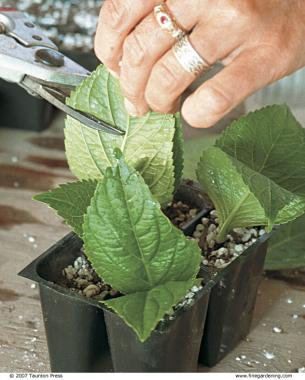
Once the cuttings are inserted into the soil, I trim the remaining leaves in half to cut down on transpiration loss. These leaves are still performing photosynthesis, even though there are no roots to draw moisture out of the soil. At this point, if I were propagating these cuttings for the nursery, I would move them into the propagation house where they would get bottom heat from a mat and moisture from a sophisticated misting system until roots develop.
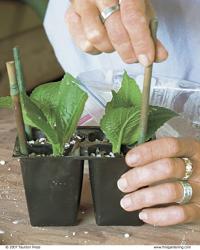
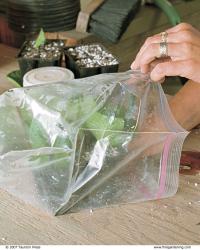
To mimic these conditions on a smaller scale, I stick small stakes into the corners of the six pack, then water the cuttings from the bottom. Finally, I tuck the tray into a plastic bag, which will create the humid conditions needed for rooting to take place. I then place the tray in a sheltered part of my garden that gets dappled sunlight and keep the cuttings moist until roots develop.
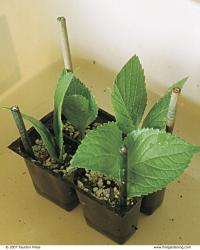
Check for root development
Some cuttings root faster than others. I’ve found that the best way to check for root development is with my eyes. After four to five weeks, I can check the bottom of each tray for small white roots that may be poking out of the drainage holes. If none are visible, another way to check for root development is by gently pulling on a cutting. If it shows some resistance, then it’s a good bet that roots have developed. If it pulls out of the tray easily, I inspect the stem for very fine root hairs. If no roots are apparent, I place the cutting back into the tray, reseal the bag, and wait a few more weeks before checking again.
Depending on the species and the growing conditions, a healthy network of primary and secondary roots should develop after six weeks in the bag. My success rate varies from shrub to shrub, but generally I get roots on about 70 percent of my cuttings. Once they’ve rooted, I pot up my tiny new shrubs into one-quart pots that I’ve filled with a mixture of 80 percent soil and 20 percent perlite, water them with a nutrient-rich seaweed- or kelp-based fertilizer and place them in a sunny spot in the garden. In the fall, I unpot them and transfer them to a sheltered nursery bed where they’ll spend the winter. Come spring, I’ll have a good supply of shrubs that I can move to a new, more permanent home.
37 shrubs that are easy to propagate from cuttings
Many deciduous garden shrubs can be propagated by softwood cuttings taken in summer. The ones listed below tend to root quickly and grow into viable shrubs in a short period of time.
Beautyberry (Callicarpa japonica)
Beautybush (Kolkwitzia amabilis)
Blue mist shrub (Caryopteris × clandonensis)
Burning bush (Euonymus alatus)
Butterfly bush (Buddleia davidii)
Chinese stranvaesia (Stranvaesia davidiana)
Crape myrtle (Lagerstroemia indica)
Daphne (Daphne caucasica)
Deciduous azaleas (Rhododendron cvs.)
Elders (Sambucus spp.)
Enkianthus (Enkianthus campanulatus)
Flowering quince (Chaenomeles speciosa)
Forsythias (Forsythia spp.)
Honeysuckles (Lonicera spp.)
Hydrangeas (Hydrangea spp.)
Japanese maples (Acer palmatum cvs.)
Kerria (Kerria japonica)
Large fothergilla (Fothergilla major)
Lilac (Syringa vulgaris)
Magnolias (Magnolia spp.)
Mock orange (Philadelphus coronarius)
Redtwig dogwood (Cornus alba and sericea)
Rugosa rose (Rosa rugosa)
Serviceberries (Amelanchier spp.)
Slender deutzia (Deutzia gracilis)
Smoke tree (Cotinus coggygria)
Spireas (Spiraea spp.)
Stewartia (Stewartia pseudocamellia)
Summersweet (Clethra alnifolia)
Sweetshrub (Calycanthus floridus)
Viburnums (Viburnum × burkwoodii and carlesii)
Virginia sweetspire (Itea virginica)
Weigelas (Weigela spp.)
Willows (Salix spp.)
Wintercreeper (Euonymus fortunei)
Winter hazels (Corylopsis spp.)
Witch hazels (Hamamelis spp.)


Comments
TK You. B.2-K. Bee Honey.!!!
How about Salal (shallon) from cuttings?
Ótimas informações.
Thank you for the info. I have only tried hydrangeas.... have had excellent luck in the spring when I have pruned hydrangeas.... I have just stuck cuttings in a pot, watered... and whoot! New Hydrangeas! This year, one new plant, of two, even bloomed!
Log in or create an account to post a comment.
Sign up Log in